Fix It, Don’t Toss It: The Complete Guide to Waterproof Testing, Patching, and Restoring Your Trudave Rain Boots
Introduction: A Better Way Than the Landfill
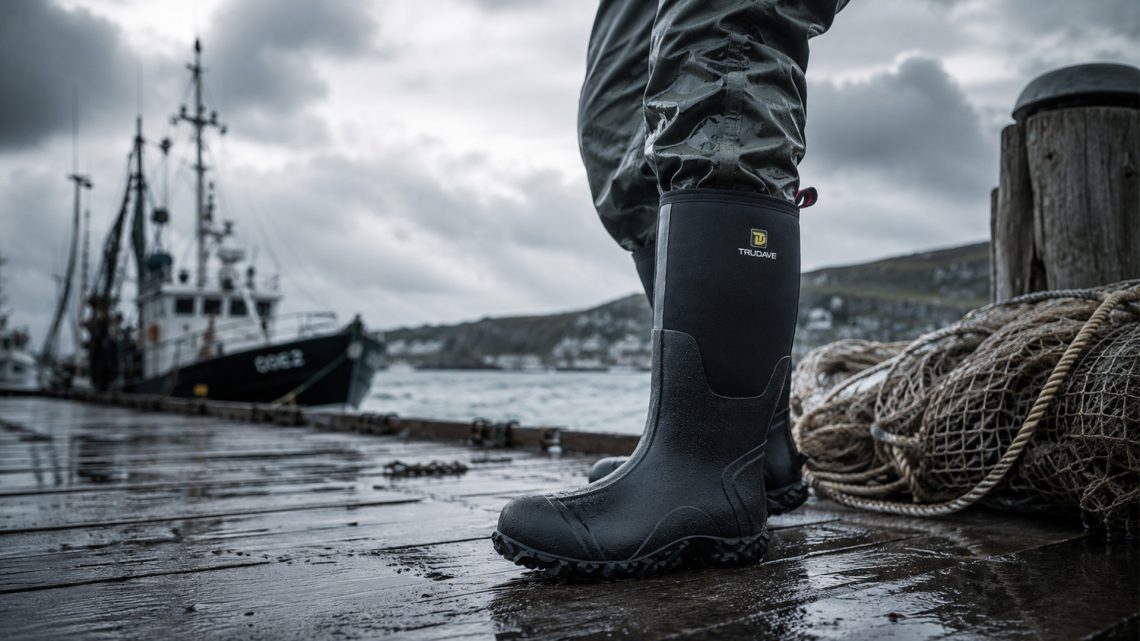
Every year, millions of rain boots end up in the trash. A cracked toe crease, a puncture from a sharp rock, a sole that’s starting to separate—most people see a broken boot and assume it’s finished. They toss it, buy a new pair, and repeat the cycle. But a well-made rain boot, particularly one built from vulcanized natural rubber like every Trudave Gear boot, is not disposable. It’s repairable, and with a little knowledge and a few basic tools, you can add years to its life.
Trudave’s rain boot lineup—from the flexible BloomBoot to the heavy-duty AquaGuard—is engineered with durability and repairability in mind. The vulcanized construction means the rubber is a single, continuous waterproof barrier with no glued seams to fail. The removable EVA insoles can be replaced when they pack out. And the natural rubber compound bonds exceptionally well with common repair adhesives, making DIY fixes permanent and reliable.
This guide will walk you through exactly how to test your boots for leaks, how to fix the three most common types of damage, and how to restore your boots to like-new condition. A $7 tube of adhesive and an hour of your time can save a $70 pair of boots from the landfill. Here’s how to do it.
1. Why Trudave Boots Are Worth Repairing
Before diving into the how-to, it’s worth understanding what makes a Trudave boot different from the cheap PVC boots that dominate the market. Those budget boots are made from petroleum-based plastic that stiffens and cracks, and they’re assembled with glued seams that separate under stress. When they fail—which they will, often within a single season—there’s not much you can do. Glue doesn’t bond well to PVC, and the material itself doesn’t have the elasticity to hold a patch.
Trudave boots are made from vulcanized natural rubber. Vulcanization, discovered by Charles Goodyear in 1839, uses heat and sulfur to cross-link the rubber molecules into a stable, elastic, waterproof material. The entire boot—the upper, the outsole, the reinforced toe and heel—is fused into one continuous piece at the molecular level. There are no layers to separate. This means when you apply a flexible rubber adhesive to a crack or a puncture, it bonds directly with the boot’s material, creating a repair that is as strong and flexible as the surrounding rubber.
On top of that, every Trudave boot has a removable EVA insole. When the insole eventually compresses after hundreds of hours of wear, you don’t have to throw the whole boot away. You simply replace the insole—with another EVA insole, with Trudave’s upgraded ToughCush Comfort Insole, or with a custom orthotic. This modular design extends the boot’s life even further.
The bottom line: a Trudave boot is an investment, and like any good investment, it can be maintained and repaired rather than replaced.
2. The At-Home Waterproof Test
Before you can fix a leak, you have to find it. Hairline cracks at the toe crease are often invisible to the naked eye but will open up under pressure. The bucket test takes 15 minutes and reveals exactly where water is getting in.
What You Need: A bucket or tub deep enough to submerge the boot to just below the shaft top, a few sheets of newspaper, and a weight (a full water bottle works well).
Step 1: Start with clean, completely dry boots.
Step 2: Crumple the newspaper and stuff it loosely into each boot, filling the interior without stretching the rubber.
Step 3: Submerge the boot in the bucket, water level just below the top of the shaft. Place the weight inside the boot—this simulates the pressure of your body weight.
Step 4: With the boot weighted, manually flex the toe area up and down several times. Watch for a stream of bubbles. Escaping air is the telltale sign of a leak, and the bubbles show you exactly where it is.
Step 5: Let the boot sit submerged for 10 to 15 minutes. Remove it, dry the exterior thoroughly with a towel, and pull out the newspaper. Any dampness indicates a leak.
If the newspaper comes out bone dry, your boots are still fully waterproof. If you find moisture, note the location and proceed to the repair section below.
3. Common Damage and DIY Fixes
The Flex-Point Crack
This is the most common failure on any rubber boot. The zone behind your toes bends with every step, and over hundreds of thousands of cycles, tiny cracks can form. Left untreated, they widen until your sock is soaked.
The Fix: Clean the area thoroughly with isopropyl alcohol and let it dry. Lightly rough the surface with fine-grit sandpaper to give the adhesive more grip. Apply a flexible waterproof adhesive like Shoe Goo or Aquaseal SR directly into the crack, working it in with a toothpick. Smooth a thin layer over the top, extending a quarter-inch beyond the crack on all sides. Let it cure undisturbed for a full 24 hours. The repair will be flexible, waterproof, and nearly invisible.
The Puncture
A nail, a piece of glass, or a sharp rock can punch right through the rubber. Punctures are usually obvious, but small ones can go unnoticed until water finds them.
The Fix: The process is the same: clean, dry, rough the surface, apply adhesive. For holes that go all the way through, work the adhesive into the hole from both the outside and the inside. A small dab on the inside, pressed flat, acts as an internal patch. Let it cure completely before wearing.
The Separated Sole
On a vulcanized Trudave boot, the sole is chemically fused to the upper. Separation is rare and usually only happens when the boot has been exposed to extreme heat (left next to a campfire or on a radiator) or harsh solvents.
The Fix: Clean the separated area. Apply a flexible adhesive to both surfaces, press them firmly together, and use clamps or heavy weights to hold the bond while it cures for at least 24 hours. If the separation extends more than an inch or two, the structural integrity of the boot is compromised, and replacement is the safer option.
What to Keep in Your Repair Kit:
- A tube of flexible waterproof adhesive
- Alcohol wipes
- A small piece of fine-grit sandpaper
- A toothpick for precise application
- Clamps or heavy weights (for sole repairs)
All of this fits in a small bag and costs less than a single replacement pair of boots.
4. When to Retire Your Boots
Some damage is terminal. A boot is no longer safe or effective when:
- The outsole tread is worn smooth, and the siping channels are gone. Traction is compromised.
- Multiple deep cracks have formed across different flex points. The rubber has lost its elasticity.
- You can feel the ground through the boot—the EVA midsole is fully compressed and no longer cushioning your steps.
- The vulcanized bond between the upper and sole is separating over more than an inch.
At this point, thank the boots for their seasons of service and recycle or repurpose them if possible. Natural rubber can sometimes be ground up for use in playgrounds and running tracks, and organizations like TerraCycle accept rubber footwear for recycling.
5. Series-Specific Repair and Care Notes
While the fundamentals are the same across Trudave’s lineup, each boot has characteristics worth noting.
BloomBoot: The 4.5mm neoprene upper is flexible and durable, but avoid using harsh solvents near the neoprene, as they can cause the material to swell. Stick to mild soap and water for cleaning, and use rubber adhesive only on the rubber lower shell.
MudTrek and GardenStride: These full-rubber boots are the most straightforward to repair. The vulcanized rubber bonds exceptionally well with adhesives, and there are no fabric liners to complicate repairs.
HeatHold: The insulated neoprene and fleece liner require extra care to keep dry. After any repair on the lower shell, perform the bucket test again to confirm the waterproof seal before trusting them in freezing conditions.
AquaGuard: The industrial-grade rubber compound is denser than standard natural rubber, so roughing the surface before applying adhesive is especially important for a strong bond. The chemical-resistant properties are unaffected by most adhesives.
AquaGrip: The suction-pod outsole can trap small debris. Pick out any embedded stones with a toothpick during your regular cleaning routine, and inspect the pods for wear. The outsole cannot be effectively repaired once the pods have worn smooth, but it will take many miles to reach that point.
Conclusion: The Satisfied Sole
There’s a quiet satisfaction in fixing something yourself. In pulling on a pair of boots that you’ve patched, cleaned, and restored, knowing they’re ready for another season of mud, rain, and hard work. Trudave Gear builds its rain boots to be worthy of that effort—vulcanized natural rubber that accepts repairs, removable insoles that can be replaced, and a construction that is, quite literally, seamless.
Before you throw away a pair of boots with a small crack or a puncture, try the bucket test. Try the adhesive. You might be surprised at how much life is left in them.
To explore Trudave’s full rain boot lineup and find the pair that’s built to last—and to be fixed when life happens—visit trudavegear.com.


You May Also Like
Managing Early Summer Pasture Stress Before Heat Peaks

Shelter Placement Secrets: How to Keep Wind Chill From Draining Your Herd
